Flashing and updating
There are two main modules in UZG-01 that can be flashed and updated, these are:
- ESP32, which is responsible for all other operation of the device: connection to Ethernet and Wi-Fi, operation of additional systems such as LEDs. The current firmware of this module is available at the Official UZG-01 Firmware repository
- CC2652P7, which controls the Zigbee network. It is flashed with Z-Stack 3.x.0 firmware available at the Official Z-Stack 3.x.0 repository:
Tip
Both ESP32 and CC2652P7 modules can be updated remotely. You do not need to have physical access to the device. Please read the next sections for updating both chips.
Update ESP32
Updating ESP32 through the browser
- Connect your UZG-01 to the PC.
- Follow this link UPDATE FIRMWARE ONLINE and press "INSTALL" button at that page.
Updating ESP32 Over the Air (distantly)
If your UZG-01 device has a LAN connection, you can update the ESP32 firmware remotely via Over-the-Air (OTA) updates feature. To update the firmware via OTA, follow these steps:
- Download the latest firmware from Official UZG-01 Firmware repository;
- Go to the web interface of the device;
-
Go to the System and Tools section. In the "ESP32 Update" card
- click Choose file;
- select the firmware (*.bin file) and
- Click ESP32 OTA Update.

-
Wait for the firmware to finish and reboot the device.
Updating ESP32 via USB
If your UZG-01 device is not connected to LAN or you want to flash ESP32 via USB for other reasons, it can be easily done via USB cable.
For this purposes you need:
- A computer with Windows or Mac installed
- USB - Type-C cable.
To flash via USB, follow these steps:
- Download the flashing software. Recommended is ESP_Flasher,can be downloaded from Official repository on Github;
- Download the latest firmware version from Official UZG-01 Firmware repository;
- Using USB cable, connect UZG-01 to your computer;
- Be sure, that you have downloaded and installed the drivers for USB/UART converter, built in to your UZG-01.
- Run the ESP_Flasher program and
- Select Serial-port in the Serial port section;
- In the Firmware section, select the file with your firmware;
- Press the "Flash ESP" button.
-
Wait for the firmware to complete.

Update Zigbee CC2652P
User can flash Zigbee SoC (which is Texas Instruments CC2562P) any of the tools described at Zigbee2MQTT.
Below you can find detail manuals for few flashing options from those links.
| Coordinator | Router |
|---|---|
| CC1352P7_coordinator_*.zip | CC1352P7_Router.zip |
Over-the-Air
Tip
Update over Ethernet can be done distantly without a physical access to your device!
Currently available methods are: Home Assistant Addon & ZigStar Multi Tool
HA Addon - Ethernet
Addon-ons for Home Assistant that allow you to easily flash new firmware on your ZigStar Coordinators

Adding this add-ons repository to your Home Assistant instance is pretty easy. In the Home Assistant add-on store, a possibility to add a repository is provided.
Use the following URL to add this repository:
- Add repository to your Home Assistant instance
- Install ZigStar: TI CC2652 Flasher Add-on
- Choose correct settings and start addon1
Until detailed instruction will be available,please check next video with English subtitles:
Multi Tool - Ethernet
-
Download latest Zigbee firmware. UZG-01 Adapter is based on CC2652P from Texas Instruments. Firmware's are based on Z-Stack. You can see the best one here Koenkk Z-Stack firmware on Github.
Danger
Currently we are moving to new Texas Instruments Chip - CC2652P7 what will support up to 300 devices
First users of UZG-01 are still using CC2652P2 chipChoose correct firmware:
UZG-01 - Use firmware with a tag "..launchpad_coordinator_";
UZG-01 v0.2+ - Use firmware with a tag "CC1352P7"; -
Download ZigStar MultiTool - choose the right version for your OS;
- Connect your UZG-01 and PC with flashing firmware to the same LAN network over ethernet (cable) connection. It is important, as because WiFi can have some delays - it is incompatible for flashing. Flashing should be done only through ethernet connection;
-
Open Flashing tool and make te following settings:
-
IP address and port of your UZG-01 will be identified automatically
192.168.110.122:6638(1)- 192.168.110.122 is an IP address and 6638 - port
-
click button
...and select your Zigbee firmware, downloaded at stage 1; - Put active checkboxes
Erase,Write,Verify, andAuto BSL; - Press
Startbutton

Warning
Zigbee connectivity (e.g. Zigbee2MQTT or ZHA) should be disconnected. Flashing is impossible when the adapter is in active state.
Danger
It is crucial that you download the correct firmware for your gateway as using the wrong firmware will disable the BSL and you will need an external debugger / programmer to flash your gateway again.
-
-
Wait until the process is completed: the progress bar contains the message "100%" and below text All is Ok. Restarting Zigbee. Flashing takes about 8 minutes;
-
That is it. Flashing is done. You can use your device now with the new Zigbee firmware. Proceed with installation
Over-the-USB
Multi Tool - USB
-
Download latest Zigbee firmware. UZG-01 Adapter is based on CC6252P from Texas Instruments. Firmware's are based on Z-Stack. You can see the best one here Koenkk Z-Stack firmware on Github.
Danger
Currently we are moving to new Texas Instruments Chip - CC2652P7 what will support up to 300 devices
First users of UZG-01 are still using CC2652P2 chipChoose correct firmware:
UZG-01 - Use firmware with a tag "..launchpad_coordinator_";
UZG-01 v0.2+ - Use firmware with a tag "CC1352P7"; -
Download ZigStar MultiTool - choose the right version for your OS;
- Connect your UZG-01 to your network and USB port;
- Be sure, that your PC has USB drivers and UZG-01 USB is recognized. If no, please install.
-
Change your UZG-01 mode to Zigbee-to-USB by pressing once Control Button.
When UZG-01 is in USB-Mode please hold 4-8 seconds to activate Flashing Mode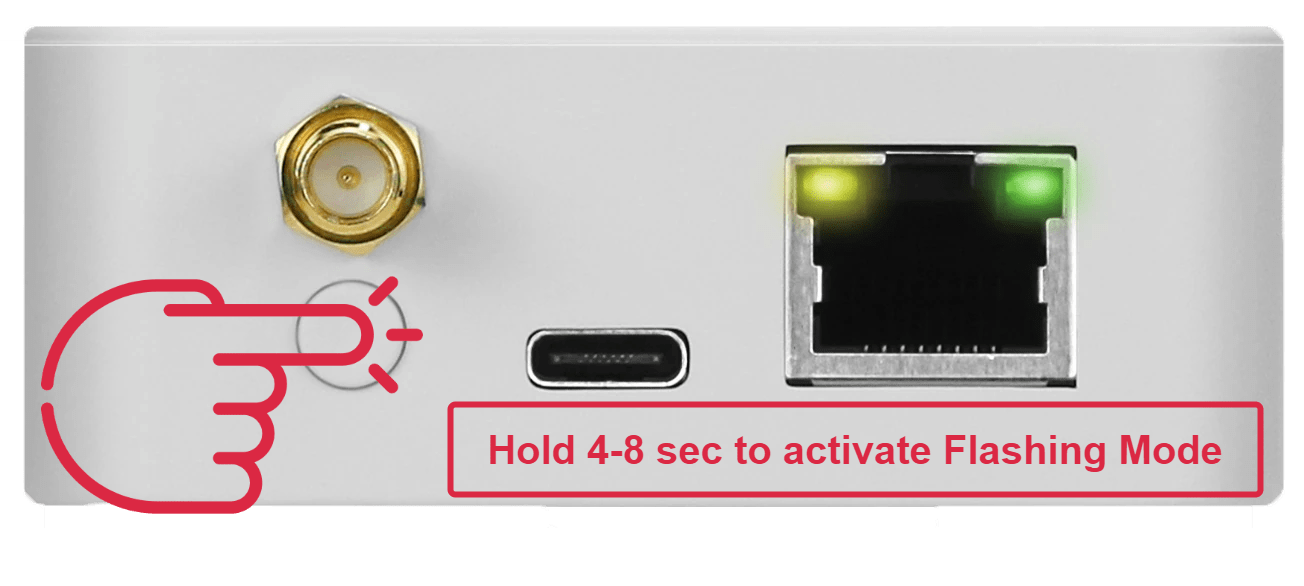
-
Open Flashing tool and make te following settings:
-
IP address and port of your UZG-01 will be identified automatically
192.168.110.122:6638(1)- 192.168.110.122 is an IP address and 6638 - port
-
click button
...and select your Zigbee firmware, downloaded at stage 1; - Put active checkboxes
Erase,Write,Verify, andAuto BSL; - Press
Startbutton
Warning
Zigbee connectivity (e.g. Zigbee2MQTT or ZHA) should be disconnected. Flashing is impossible when the adapter is in active state.
Danger
It is crucial that you download the correct firmware for your gateway as using the wrong firmware will disable the BSL and you will need an external debugger / programmer to flash your gateway again.
-
-
Wait until the process is completed: the progress bar contains the message "100%" and below text All is Ok. Restarting Zigbee. Flashing takes about 8 minutes;
-
That is it. Flashing is done. You can use your device now with the new Zigbee firmware. Proceed with installation
SmartRF FP2 - USB
Tip
Texas Instruments is a manufacturer of Zigbee SoC CC2652P which is used in UZG-01 adapter. The most "original" method is to use official flasher but it is more complicated process.
-
Download latest Zigbee firmware. UZG-01 Adapter is based on CC6252P from Texas Instruments. Firmware's are based on Z-Stack. You can see the best one here Koenkk Z-Stack firmware on Github.
Danger
Currently we are moving to new Texas Instruments Chip - CC2652P7 what will support up to 300 devices
First users of UZG-01 are still using CC2652P2 chipChoose correct firmware:
UZG-01 - Use firmware with a tag "..launchpad_coordinator_";
UZG-01 v0.2+ - Use firmware with a tag "CC1352P7"; -
Download official Texas Instruments Flash Programmer 2;
- Install Flash Programmer 2;
- Connect your UZG-01 to your network and USB port;
- Be sure, that your PC has USB drivers and UZG-01 USB is recognized. If no, please install.
-
Change your UZG-01 mode to Zigbee-to-USB by pressing once Control Button.
When UZG-01 is in USB-Mode please hold 4-8 seconds to activate Flashing Mode -
Open your Flash Programmer 2 from step 3. At the left window
Connected devicesclick onUnknownand below atSelected targetchooseCC2652P;- Select firmware file under the Flash images(s) with the option
Single; - Make active checkboxes
Erase(All unprotected pages),Program(Entire source file),Verify(CRC check) - Please very very careful, the
Disable bootloadershould remain UNCHECKED. Otherwise you will not be able to flash CC2652P via USB or LAN but just with external programmer; - Press the
Startbutton (with Triangular) to Start the flashing. - Wait until the message
Success!is appeared at the progressbar and Status window statesReset of target successful.

Warning
Disable bootloadershould remain UNCHECKED - Select firmware file under the Flash images(s) with the option
-
That is it. Flashing is done. You can use your device now with the new Zigbee firmware. Proceed with installation
Update with HW flasher
UZG-01 adapter contains DIY pinouts that enable users to flash directly by J-TAG. Please note, that pin-outs are 2.54mm size.
-
Detailed video instruction will provided soon. ↩